Homebrew
国内安装比较麻烦,最好走镜像,参考地址:HomebrewCN: Homebrew 国内安装脚本,快速部署 brew ,国内镜像
安装脚本如下:
/bin/zsh -c "$(curl -fsSL https://gitee.com/cunkai/HomebrewCN/raw/master/Homebrew.sh)"卸载脚本如下:
/bin/zsh -c "$(curl -fsSL https://gitee.com/cunkai/HomebrewCN/raw/master/HomebrewUninstall.sh)"这个方法安装的Homebrew使用了清华大学源的Core,可能会出现问题,更换为阿里云的即可,修改~/.zprofile,在export里添加Homebrew的Core的远程仓库,完整的如下:
  export HOMEBREW_PIP_INDEX_URL=http://mirrors.aliyun.com/pypi/simple #ckbrew
  export HOMEBREW_BREW_GIT_REMOTE=https://mirrors.aliyun.com/homebrew/brew.git #ckbrew
  export HOMEBREW_CORE_GIT_REMOTE=https://mirrors.aliyun.com/homebrew/homebrew-core.git #ckbrew
  export HOMEBREW_API_DOMAIN=https://mirrors.aliyun.com/homebrew/homebrew-bottles/api  #ckbrew
  export HOMEBREW_BOTTLE_DOMAIN=https://mirrors.aliyun.com/homebrew/homebrew-bottles #ckbrew
  eval $(/opt/homebrew/bin/brew shellenv) #ckbrew
Parallels Desktop
截止2024/08/28,拿到的最佳搭配是19.3.0配合激活工具5.1.1。
先附上PD的下载地址:Parallels Desktop 19.3.0,附件激活工具:Parallels_Desktop_Activation_Tool.dmg
容易有Bug,不要使用完整的Clone操作,否则导致Mac的磁盘空间统计异常。
Aria2
配置
用brew安装后写一下配置文件:
mkdir ~/.aria2
cd ~/.aria2
touch aria2.conf
具体的配置文件如下,直接拷贝进去就完事了:
#用户名
#rpc-user=user
#密码
#rpc-passwd=passwd
#上面的认证方式不建议使用,建议使用下面的token方式
#设置加密的密钥
rpc-secret=c296466115c930df00721f39f32be37e29ed8683
#允许rpc
enable-rpc=true
#允许所有来源, web界面跨域权限需要
rpc-allow-origin-all=true
#允许外部访问,false的话只监听本地端口
rpc-listen-all=true
#RPC端口, 仅当默认端口被占用时修改
#rpc-listen-port=6800
#最大同时下载数(任务数), 路由建议值: 3
max-concurrent-downloads=5
#断点续传
continue=true
#同服务器连接数
max-connection-per-server=5
#最小文件分片大小, 下载线程数上限取决于能分出多少片, 对于小文件重要
min-split-size=10M
#单文件最大线程数, 路由建议值: 5
split=10
#下载速度限制
max-overall-download-limit=0
#单文件速度限制
max-download-limit=0
#上传速度限制
max-overall-upload-limit=0
#单文件速度限制
max-upload-limit=0
#断开速度过慢的连接
#lowest-speed-limit=0
#验证用,需要1.16.1之后的release版本
#referer=*
#文件保存路径, 默认为当前启动位置
dir=/Users/evalexp/Downloads
#文件缓存, 使用内置的文件缓存, 如果你不相信Linux内核文件缓存和磁盘内置缓存时使用, 需要1.16及以上版本
#disk-cache=0
#另一种Linux文件缓存方式, 使用前确保您使用的内核支持此选项, 需要1.15及以上版本(?)
#enable-mmap=true
#文件预分配, 能有效降低文件碎片, 提高磁盘性能. 缺点是预分配时间较长
#所需时间 none < falloc ? trunc « prealloc, falloc和trunc需要文件系统和内核支持
# file-allocation=prealloc
all-proxy=http://127.0.0.1:46721注意配置外部RPC的密钥:c296466115c930df00721f39f32be37e29ed8683
开机自启
通过brew services管理会更方便,写入如下内容到/opt/homebrew/opt/aria2/homebrew.mxcl.aria2.plist:
<?xml version="1.0" encoding="UTF-8"?>
<!DOCTYPE plist PUBLIC "-//Apple//DTD PLIST 1.0//EN" "http://www.apple.com/DTDs/PropertyList-1.0.dtd">
<plist version="1.0">
    <dict>
        <key>Label</key>
        <string>homebrew.mxcl.aria2</string>
        <key>ProgramArguments</key>
        <array>
            <string>/opt/homebrew/opt/aria2/bin/aria2c</string>
        </array>
        <key>RunAtLoad</key>
        <true/>
        <key>KeepAlive</key>
        <true/>
    </dict>
</plist>然后直接启动即可:brew services start aria2
移除使用:
brew services stop aria2
Mihomo
配置
同样通过Homebrew安装,然后注意使用Subconvert聚合一下订阅信息。
完成后修改一下配置:
mixed-port: 46721
allow-lan: true
mode: Rule
log-level: silent
ipv6: true
external-ui: ./ui
external-ui-name: metacubexd
external-ui-url: https://github.com/MetaCubeX/metacubexd/archive/refs/heads/gh-pages.zip
external-controller: 127.0.0.1:46720
secret: abcdefg
tun:
  enable: false
  stack: mixed
  dns-hijack:
    - any:53
    - tcp://any:53
  auto-route: true
  auto-redirect: true
  auto-detect-interface: true
sniffer:
  enbale: true
  force-dns-mapping: true
  parse-pure-ip: true
  sniff:
    HTTP:
      ports:
        - 80
        - 8080-8880
      override-destination: true
    TLS:
      ports:
        - 443
        - 8443
    QUIC:
      ports:
        - 443
        - 8443

  skip-domain:
    - "+.push.apple.com"
dns:
  enable: true
  ipv6: false
  enhanced-mode: redir-host
  respect-rules: true
  use-system-hosts: true
  use-hosts: true
  default-nameserver:
    - 223.5.5.5
    - 223.6.6.6
    - 119.29.29.29
    - 1.1.1.1
  proxy-server-nameserver:
    - https://223.5.5.5/dns-query
    - https://223.6.6.6/dns-query
    - https://doh.pub/dns-query
  direct-nameserver:
    - https://223.5.5.5/dns-query
    - https://223.6.6.6/dns-query
    - https://doh.pub/dns-query
  nameserver:
    - https://223.5.5.5/dns-query
    - https://223.6.6.6/dns-query
- https://doh.pub/dns-query将最前方的配置修改成这样,然后拷贝到/opt/homebrew/etc/mihomo/config.yaml,再通过sudo brew services start mihomo即可。
如果没有启动成功,就要看一下是什么问题了,通过命令行启动查看问题:
sudo /opt/homebrew/opt/mihomo/bin/mihomo -d /opt/homebrew/etc/mihomo
INFO[2025-05-13T15:39:01.013729000+08:00] Start initial configuration in progress
INFO[2025-05-13T15:39:01.016471000+08:00] Geodata Loader mode: memconservative
INFO[2025-05-13T15:39:01.016528000+08:00] Geosite Matcher implementation: succinct
INFO[2025-05-13T15:39:01.020245000+08:00] Can't find MMDB, start download
ERRO[2025-05-13T15:39:01.115460000+08:00] can't initial GeoIP: can't download MMDB: Get "https://github.com/MetaCubeX/meta-rules-dat/releases/download/latest/geoip.metadb": connect failed: dial tcp 20.205.243.166:443: connect: connection refused
FATA[2025-05-13T15:39:01.115516000+08:00] Parse config error: rules[10265] [GEOIP,CN,🎯 全球直连] error: can't download MMDB: Get "https://github.com/MetaCubeX/meta-rules-dat/releases/download/latest/geoip.metadb": connect failed: dial tcp 20.205.243.166:443: connect: connection refused
可以看到是GitHub无法访问导致的,那么就要多试几次或者先接NAS的代理网络。
完成后启动应该是这样的:
sudo /opt/homebrew/opt/mihomo/bin/mihomo -d /opt/homebrew/etc/mihomo
INFO[2025-05-13T15:41:34.736789000+08:00] Start initial configuration in progress
INFO[2025-05-13T15:41:34.738932000+08:00] Geodata Loader mode: memconservative
INFO[2025-05-13T15:41:34.738941000+08:00] Geosite Matcher implementation: succinct
INFO[2025-05-13T15:41:34.743043000+08:00] Initial configuration complete, total time: 6ms
有时候我们可能需要用到Tun模式,因此在上面的配置其实已经配置了Tun相关的内容,不过默认是不启用的,如果无需使用Tun模式的情况下,可以不使用
sudo启动,没有影响;在可能用到Tun模式的情况下还是需要使用sudo启动服务。另外请注意,如果在日志链接中发现嗅探失败,即存在大量的IP地址链接时,一般是由于没有设置系统DNS导致,务必设置系统DNS为互联网DNS,设置为局域网DNS时无法劫持导致IP地址无法对应域名。
订阅更新与面板快速打开
环境变量配置:
export MIHOMO_CONFIG="/opt/homebrew/etc/mihomo/config.yaml"
export SUBSCRIPTION_URL="https://sub.loc"可以通过shell来实现,注意需要环境变量MIHOMO_CONFIG以及SUBSCRIPTION_URL:
clash-sub-update() {
  echo "Backup file to $MIHOMO_CONFIG.bak ... "
  mv $MIHOMO_CONFIG "$MIHOMO_CONFIG.bak"
  echo "Request subscription..."
  curl -o $MIHOMO_CONFIG $SUBSCRIPTION_URL
  echo "Reloading mihomo..."
  curl "http://127.0.0.1:$(sed -n 's/^external-controller:[[:space:]]*.*:\(.*\)/\1/p' $MIHOMO_CONFIG)/configs?force=true" -H "Authorization: Bearer $(sed -n 's/^secret:[[:space:]]*\(.*\)/\1/p' $MIHOMO_CONFIG)" -H "Content-Type: application/json" -d "{}" -XPUT
  echo "Done."
}
clash-dash() {
  open "http://127.0.0.1:$(sed -n 's/^external-controller:[[:space:]]*.*:\(.*\)/\1/p' $MIHOMO_CONFIG)/ui/metacubexd/#/setup?host=127.0.0.1&hostname=127.0.0.1&port=$(sed -n 's/^external-controller:[[:space:]]*.*:\(.*\)/\1/p' $MIHOMO_CONFIG)&secret=$(sed -n 's/^secret:[[:space:]]*\(.*\)/\1/p' $MIHOMO_CONFIG)"
}
clash-sub-time() {
  echo "Current subscription modified time: $(stat -f '%Sm' -t '%Y-%m-%d %H:%M:%S' $MIHOMO_CONFIG)"
  seconds=$(( $(date +%s) - $(stat -f "%m" $MIHOMO_CONFIG) ))
  days=$((seconds / 86400))
  hours=$(( (seconds % 86400) / 3600 ))
  minutes=$(( (seconds % 3600) / 60 ))
  secs=$((seconds % 60))
  echo
  echo "$days days, $hours hours, $minutes minutes, $secs seconds ago"
}
全局代理
还是一样用Shell脚本即可:
clash-global-proxy-enable() {
  port=$(cat $MIHOMO_CONFIG | grep -E "^mixed-port:" | grep -o '[0-9]\+')
  if [ $? -ne 0 ]; then
    echo "Mixed port not found in $MIHOMO_CONFIG"
    port=$(cat $MIHOMO_CONFIG | grep -E "^socks-port:" | grep -o '[0-9]\+')
    if [ $? -ne 0 ]; then
      echo "Socks port not found in $MIHOMO_CONFIG"
      echo "None of socks port available, please check your config : $MIHOMO_CONFIG"
      return 1
    fi
  fi
  echo "Set global proxy to socks5://127.0.0.1:$port"
  sudo networksetup -setsocksfirewallproxy Wi-Fi 127.0.0.1 $port && echo "Done."
}
alias clash-global-proxy-disable='echo "Unset global proxy..." && sudo networksetup -setsocksfirewallproxystate Wi-Fi off && echo "Done."'
Burp 虚拟机配置
由于在Windows里的虚拟机里使用的是ZuluJDK Arm64版本,因此实际上在Java中取到的os.arch为arm64,将其强制修改为win64即可启动Burp内置的浏览器,加参数:-Dos.arch=win64。
关于字体漂移,修改字体为12号宋体即可。
也可以使用exe安装,完成后配置VMOptions即可。
虚拟机里Java程序分辨率异常
加JVM参数:
-Dsun.java2d.dpiaware=false虚拟机里的Java程序SSL异常
加JVM参数
-Djsse.enableSNIExtension=falseBurp Mac配置
直接下载官方的dmg版本,注意选择M芯片,不然浏览器打不开。下载后需要修改一下VMOptions:
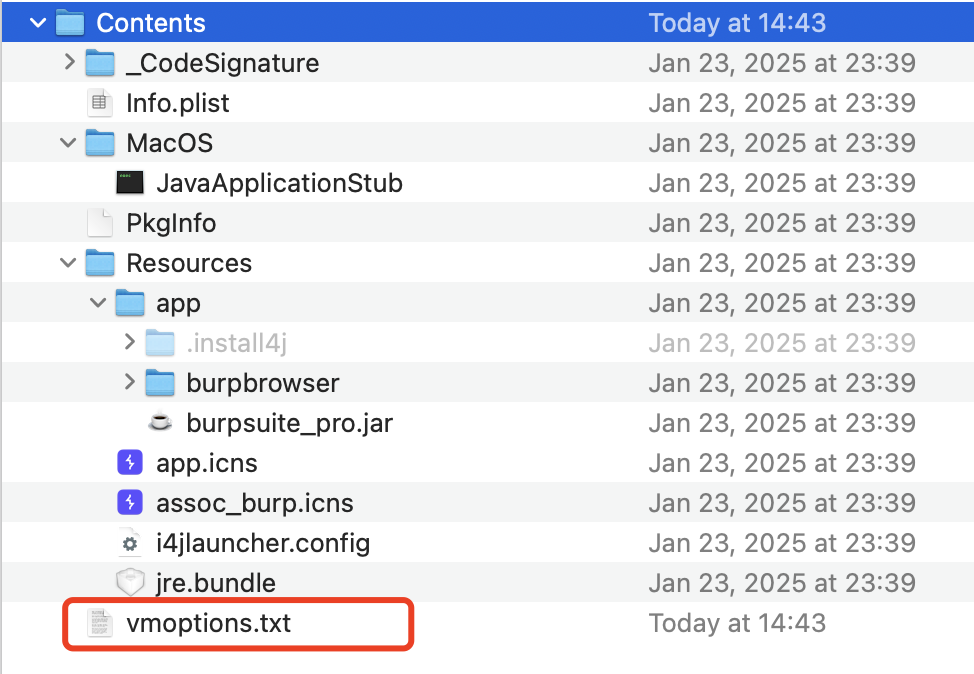
添加内容如下:
--add-opens=java.desktop/javax.swing=ALL-UNNAMED
--add-opens=java.base/java.lang=ALL-UNNAMED
--add-opens=java.base/jdk.internal.org.objectweb.asm=ALL-UNNAMED
--add-opens=java.base/jdk.internal.org.objectweb.asm.tree=ALL-UNNAMED
--add-opens=java.base/jdk.internal.org.objectweb.asm.Opcodes=ALL-UNNAMED
-javaagent:/Users/evalexp/Tools/Web/BurpSuite/BurpLoaderKeygen.jar
-noverify
最后的Jar注意位置信息。
OpenConnect 虚拟机配置
由于Arm64架构,自带的wintun64.dll是64位的,无法正常使用,导致无法连接OpenConnect的节点。
解决方案是弃用wintun方案,该用OpenVPN的Win TAP方案,下面是OpenVPN Win Tap的所有Win10平台的驱动,Win11也可以兼容:
解压后将其中的arm64文件夹丢到Win11的虚拟机里,然后进入设备管理器,菜单上依次选择操作->添加过时硬件->手动选择的硬件->选择网络适配器->从磁盘安装(选择刚刚解压文件夹里的inf文件)完成后使用命令行方式连接openconnect即可(GUI方式仍不可用)。
卸载pkg
pkgutil --files xxx.xxx.xxx
# 删除上面的全部文件和目录
sudo pkgutil --forget xxx.xxx.xxx
Sudo使用指纹认证
编辑文件:
sudo cp /etc/pam.d/sudo_local.template /etc/pam.d/sudo_local
sudo vim /etc/pam.d/sudo_local
# In Vim
# sudo_local: local config file which survives system update and is included for sudo
# uncomment following line to enable Touch ID for sudo
auth       sufficient     pam_tid.so # 这行取消注释即可
# Save and quit vim将模板文件拷贝成sudo_local后,取消注释即可。
VMWare Fusion安装Win11没网络跳过
按Shift + F10,输入oobe\ByPassNRO即可;重新加载就会看到了我没有Internet的选项了。
ZSH
安装 oh-my-zsh
sh -c "$(curl -fsSL https://raw.githubusercontent.com/ohmyzsh/ohmyzsh/master/tools/install.sh)"注意挂代理
设置主题
omz theme set ys可以用
omz theme load xxx动态加载主题,用omz theme list列出主题,选择适合自己的
插件
先下载zsh-autosuggestions:
git clone https://github.com/zsh-users/zsh-autosuggestions ${ZSH_CUSTOM:-~/.oh-my-zsh/custom}/plugins/zsh-autosuggestions然后编辑~/.zshrc启用:
plugins=(
    git
    z
    sudo
    extract
    zsh-autosuggestions
)
JDK配置
MacOS识别JDK
个人是一向喜欢下载ZuluJDK-FX来作为自己的主用JDK的,同时并不喜欢使用pkg去安装,一般会下载tar.gz格式解压到自己的.soft/java目录下面,但是这样在MacOS中其实并不能使用到系统自带的JDK管理功能。
因此需要建立软链接并定义配置让MacOS能正常识别解压的JDK,以JDK 8为例,首先创建对应的文件夹,并链接到对应的位置:
sudo mkdir -p /Library/Java/JavaVirtualMachines/zulufx-8.jdk/Contents
sudo ln -s \
/Users/evalexp/.soft/java/zulu8.92.0.21-ca-fx-jdk8.0.482-macosx_aarch64 \
/Library/Java/JavaVirtualMachines/zulufx-8.jdk/Contents/Home然后创建文件/Library/Java/JavaVirtualMachines/zulufx-8.jdk/Contents/Info.plist,内容如下:
<?xml version="1.0" encoding="UTF-8"?>
<!DOCTYPE plist PUBLIC "-//Apple//DTD PLIST 1.0//EN"
 "http://www.apple.com/DTDs/PropertyList-1.0.dtd"\>
<plist version="1.0">
<dict>
    <key>CFBundleIdentifier</key>
    <string>com.azul.zulu.jdk8.fx</string>

    <key>CFBundleName</key>
    <string>Zulu JDK 8 FX</string>

    <key>JavaVM</key>
    <dict>
        <key>JVMPlatformVersion</key>
        <string>8</string>

        <key>JVMVendor</key>
        <string>Azul Systems</string>

        <key>JVMVersion</key>
        <string>1.8.0_482</string>

        <key>JVMCapabilities</key>
        <array>
            <string>CommandLine</string>
        </array>
    </dict>
</dict>
</plist>
这里对应的名字需要自己去编辑然后填入;完成后MacOS就能正常识别安装的JDK了:
$ /usr/libexec/java_home -V
Matching Java Virtual Machines (1):
    1.8.0_482 (arm64) "Azul Systems" - "Zulu JDK 8 FX" /Library/Java/JavaVirtualMachines/zulufx-8.jdk/Contents/Home
/Library/Java/JavaVirtualMachines/zulufx-8.jdk/Contents/Home
非JDK8的,JVMVersion直接以数字序列指定即可,如
21或者25,无需类似1.8.0_482这种格式。
终端JDK版本设置
可以写一个简单的shell函数来实现快速的版本切换:
# JDK
set-jdk() {
  if [ -z "$1" ]; then
    echo "Usage: set-jdk <java_version>"
    return 1
  fi
  version=$1
  if [ "$version" = "8" ]; then
    version="1.8"
  fi

  export JAVA_HOME=$(/usr/libexec/java_home -v "$version")
  echo "try set JDK to $1, now home set to: $JAVA_HOME"
}
然后就可以通过set-jdk 8或者set-jdk 25来动态切换JDK了;不过这里有一些不完善的是,如果指定一个不存在的JDK版本,会重设为最新版本的JDK。
RAM DISK
防止某些软件缓存或者日志写入过多,可以使用内存的空间作为硬盘。
创建RAM DISK
$ hdid -nomount ram://50331648
/dev/disk4
这里的数量计算是:字节数 / 512,比如这里就是24G,计算过程为 24 * 1024 * 1024 * 1024 / 512 = 50331648
完成后会输出一个路径,这个是硬盘的路径。
接着将其创建为DISK:
$ diskutil apfs create /dev/disk4 ramdisk
Started APFS operation on disk4
Creating a new empty APFS Container
Unmounting Volumes
Switching disk4 to APFS
Creating APFS Container
Created new APFS Container disk5
Disk from APFS operation: disk5
Finished APFS operation on disk4
Started APFS operation on disk5
Preparing to add APFS Volume to APFS Container disk5
Creating APFS Volume
Created new APFS Volume disk5s1
Mounting APFS Volume
Setting volume permissions
Disk from APFS operation: disk5s1
Finished APFS operation on disk5
这样子就成功创建了,此时在Finder中就可以看到这个硬盘了:
